git is very powerful tool which almost every developer needs to use on daily basis, but for most us it's usage is reduced to just a few commands such as pull, commit and push. To be efficient, productive and wield the full power of git however, one needs to know a few more commands and tricks. So, in this article we will explore some of the easy to use, remember and configure features of git, that might make your time dealing with version control so much more enjoyable.
Improving The Basic Workflow
Before we use even the most basic commands such as pull, commit and push, we need to find out what is going on with our branches and changed files. For that we would use git log which is pretty common knowledge, but not everybody knows how to make it's output actually readable and pretty:
git log --graph --abbrev-commit --decorate --all --format=format:"%C(bold blue)%h%C(reset) \
    - %C(bold cyan)%aD%C(dim white) - \
    %an%C(reset) %C(bold green)(%ar)%C(reset)%C(bold yellow)%d%C(reset)%n %C(white)%s%C(reset)"

This kind of a graph can give you a good overview, but oftentimes you might need to dig a little deeper. For example see history/evolution of specific files or even individual functions and git log (with -L :<funcname>:<file> argument) can do that too:

Now that we have a bit better idea of what's going on in the repository, we might want to check differences between our updated files and the latest commit. For that we would use git diff, again nothing really new here, but diff has some options and flags that you might not know about. For example you can compare two branches with git diff branch-a..branch-b or even specific files in different branches with git diff <commit-a> <commit-b> -- <path(s)>.
Sometimes output of git diff might become quite hard to read. To help with that, you can try using -w flag, which ignores all whitespaces, making the diff little more "spammy" or --word-diff --color-words to work on words instead of whole lines.

If the basic static output in shell isn't good enough for you, then you can launch difftool using git difftool=vimdiff, which would open the diff side-by-side in vim editor. Vim is obviously not the only option here, you can run git difftool --tool-help to see list of all the valid diffing tools you can use.
We've seen how to view history of specific parts/lines in file using git log. Similar thing would also be handy with - for example - staging parts of files, right? This can be done pretty easily in IDE, such as IntelliJ, but it's not that straightforward with git CLI, but it's possible using git add --patch:
git add fib.py --patch
diff --git a/fib.py b/fib.py
index e95a02c..8ac1035 100644
--- a/fib.py
+++ b/fib.py
@@ -1,3 +1,5 @@
+from math import sqrt
+
 # This function computes Fibonacci sequence
 def fibonacci(n):
     if n <= 0:
(1/2) Stage this hunk [y,n,q,a,d,j,J,g,/,e,?]? y
This opens an editor, which shows one "hunk", which is a piece of code with some differing lines in it. There are a lot of things you can do with this hunk, but the most important options are y - accept the changes (stage the hunk), n - don't accept (do no stage the hunk) and e - edit the hunk before staging (full list of options here).
After you complete interactive staging, you can run git status and you will see that the partially staged file is both in the section Changes to be committed: and Changes not staged for commit:. You can also run git add -i (interactive staging) and then use s (status) command which will show you which lines are staged and which are not.
Fixing Common Mistakes
After staging files, I (way too) often realise that I added something I didn't want to. git doesn't have actual command to un-stage a file(s), though. To get around this limitation we can reset the repository using git reset --soft HEAD somefile.txt. You can also include -p with git reset, which will give you similar UI to the one shown with git add -p. Also, don't forget to add the --soft flag here, otherwise you will wipe your local changes!
Using (a Little Less) Force
Now that we've staged everything, all that's left is to commit and push. But what if we forgot to add something or we made a mistake and we want to amend already pushed commits? There's simple solution to this using git commit -a and git push --force, but that can be quite dangerous if we're working on shared branch such as master. So, to avoid the risk of overwriting someone else's work with our force-push we can use --force-with-lease flag. This flag - unlike --force - will only push changes if no one else has added any changes to the branch in the meantime. If the branch was changed, our push will get rejected, which is an indication that we have to pull latest changes, before pushing.
The Proper Way to Merge
If you work on repository that involves more than one developer, it's safe to assume that you work in your separate branch and not on master. That also means that sooner or later you will have to incorporate your code into the codebase (master branch). It's quite likely then, that while you were working on your branch, somebody else already added their code to master branch making your feature branch lag a few commits behind. Now, you can just go ahead and merge you code into master using git merge, but that will create extra merge commit and make the history (unnecessarily) more complex and harder to read:

Much better approach (feel free to argue with me on this, this is a figurative hill I'm willing to die on) here would be to first rebase the feature branch onto master and then perform so-called fast-forward merge (git merge --ff). This maintains linear history which is easier to read and makes it also easier to later look for commits that introduced some specific feature or a bug.
But how do we do this rebase thing? Well, you can perform rebase in its most basic form with git rebase master feature/branch, which will often be sufficient (followed by force-push). To get the most out of the git rebase though, you should also include -i to start an interactive rebase session which is a handy tool for e.g. rewording, squashing or generally cleaning up your commits and whole branch. As a little demonstration we can even rebase branch onto itself:
git rebase -i @~4 # @ is same as HEAD
The above effectively allows us to re-apply last 4 commits while making modification to them. For example squashing some and rewording others:
# git log before rebase

* 48a68b1 - Mon, 18 Jan 2021 17:43:24 +0100 - MartinHeinz (64 minutes ago) (HEAD -> feature/issue-02, origin/feature/issue-02)
|  Refactoring.
* 898d430 - Mon, 18 Jan 2021 17:39:14 +0100 - MartinHeinz (68 minutes ago)
|  Update docs again.
* 31201a9 - Mon, 18 Jan 2021 15:01:43 +0100 - Martin Heinz (4 hours ago)
|  Update docs.
* 715c46a - Mon, 18 Jan 2021 14:48:56 +0100 - Martin Heinz (4 hours ago)
|  Fix bug.
| ...

# Start of interactive rebase

pick 715c46a Fix bug.
pick 31201a9 Update docs.
pick 898d430 Update docs again.
pick 48a68b1 Refactoring.
# Rebase c5eb07e..48a68b1 onto 48a68b1 (4 commands)
...

# Rebasing changes

reword 31201a9 Update docs.      # You will be prompted to reword this
fixup 898d430 Update docs again.
pick 48a68b1 Refactoring.        # You will be prompted to reword this
squash 715c46a Fix bug.
# Rebase c5eb07e..48a68b1 onto 48a68b1 (4 commands)
...

# git log after rebase (+ rewording)

* 11495c3 - Mon, 18 Jan 2021 17:43:24 +0100 - Martin Heinz (84 minutes ago) (HEAD -> feature/issue-02)
|  Refactoring and fixes.
* 561c327 - Mon, 18 Jan 2021 15:01:43 +0100 - Martin Heinz (4 hours ago)
|  Update documenatation.
|  ...
The above example shows sample of a rebase session. At the top we see how the branch looked before rebase. Second part of the snippet shows list of commits we get presented with after running git rebase ..., each of them with pick action. We can change action for each of these and also re-order them completely. As shown in the third section of the example, some of the actions you can use are - reword which instructs git to open commit message editor for you, squash which will meld the commit into one preceding it and fixup which is same as squash but it will also discard a commit message. After we apply these changes and reword the modified commits we will end up with history shown at bottom of above example.
If during rebasing you run into some conflict, then you can run git mergetool --tool=vimdiff to resolve them and then continue rebasing with git rebase --continue. You might be unfamiliar with git mergetool and looking at it for the first time might be quite intimidating. It really is the same thing you would see in IDE like IntelliJ, just in "Vim style". As with any tool that uses vim, it's pretty hard to navigate and use it if you don't know at least a few shortcuts and in this case it can be difficult to even realize what you're actually looking at. So, in case you need some help here, I recommend reading this comprehensive write-up.
If all the above feels too complicated or you're just scared of using rebase you can alternatively create pull request in GitHub and use the Rebase and merge button to do at least the simple fast-forward rebases/merges.
Efficiency is a Key
I think the above examples showed some nifty tips and tricks, but it might be quite hard to remember all of these, especially when it comes to commands like git log. Luckily, we can use gits global config and aliases to overcome this and make things much more convenient to use. The global git config is located in ~/.gitconfig and is updated every time you run git config --global .... Even if you didn't try to set this file up, it probably contains some basic stuff like [user] section, but there's much more you can put in:
# .gitconfig
[user]
	name = MartinHeinz
	email = martin7.heinz@gmail.com
	signingkey = 7FBRA885E6354BC3E489CAF3D8B87B8N91F7538Q
[core]
	autocrlf = input
    editor = vim  # git config --global core.editor vim
[alias]
    graph = log --graph --abbrev-commit --decorate --all --format=format:"%C(bold blue)%h%C(reset) \
    - %C(bold cyan)%aD%C(dim white) \
    - %an%C(reset) %C(bold green)(%ar)%C(reset)%C(bold yellow)%d%C(reset)%n %C(white)%s%C(reset)"
[help]
	autocorrect = 10  # git config --global help.autocorrect 10
[commit]
	gpgsign = true
Above you can see example of some of the available config options. Notably the looong git log command aliased to git graph. Autocorrect set to 10, which enables it and makes it wait 1 second, before executing correct command that was misstyped and lastly config for GPG commit signature (more on that below).
Setting up .gitconfig with bunch of aliases would warrant an article on its own and there are also quite a few good resources and examples out there for what you can include in your .gitconfig, so instead of giving you exhaustive list of all the options and aliases, I will leave here these few resources:
- https://github.com/jessfraz/dotfiles/blob/master/.gitconfig
- https://gist.github.com/pksunkara/988716
- https://github.com/mgedmin/dotfiles/blob/master/gitconfig
Similar productivity boost as with aliases can be also achieved with command auto-completion. You can install it simple using:
cd ~
curl https://github.com/git/git/blob/master/contrib/completion/git-completion.bash

# Add the following to you .bash_profile or .bashrc
if [ -f ~/.git-completion.bash ]; then
  . ~/.git-completion.bash
fi
Extras
Apart from building your own convenient aliases, you can also just grab git-extras plugin which introduces a lot of useful commands that can make your life a little bit easier. I'm not going to go into detail about all the features of this plugin - for that you can check out it's list of commands - but just to give you a quick sample of what's inside:
git delta- Lists files that differ from another branch.git show-tree- Show the decorated graph view of commits from all branches, similar togit logshown earlier.git pull-request- Create pull request via commandline.git changelog- Generates a changelog from tags and commit messages.
Of course this is not the only cool plugin out there. For example, another handy tool is git-open which allows you to open repo in browser directly from CLI. You might also want to configure repository status in your terminal's prompt, which you can do with help of zsh or bash-it.
Signing Commits
Even if you've never contributed to any OSS project, you have probably scrolled through commit history of one such project. In that commit history you've most likely have seen commit sign-off and/or signed/verified commit badge. But what are those and why you might want to use them?
First of them - commit sign-off - is used by some projects to say that you certify that you have created the code in question, or that you certify that to the best of your knowledge, it was created under an appropriate open-source license. This is used for legal reasons regarding copyright status of the code. You generally don't need to use it, but if you want to at some point contribute code to a project that requires it, then this is how to use it:
~ $ git commit -m "Update docs." --signoff
[feature/issue-02 a2385f4] Update docs.
 1 file changed, 1 insertion(+)

~ $ git log
commit 31201a9a91983641897ac1e6c2ee0217a4952d7c
Author: Martin Heinz <martin7.heinz@gmail.com>
Date:   Mon Jan 18 15:01:43 2021 +0100

    Update docs.

    Signed-off-by: Martin Heinz <martin7.heinz@gmail.com>
...
From above we can see that running git commit with --sign-off option automatically added Signed-off-by: ... line at the end of commit message based on your username from git config.
As for the signed/verified badge you've probably noticed in some repositories - it exists, because it's pretty easy to impersonate other users on GitHub. All you need to do is change committer name and email in your config, and push your code changes. To prevent such impersonation, you can use commit singing using GPG keys, this verifies that the person who committed and pushed the code in the commit is really who they claim to be. This one is more common than commit sign-off as it's important to know who actually contributed the code.
If you want to start using this feature or maybe enforce this with your team, then you can do the following:
gpg --list-keys  # Check if there are any keys already
gpg --gen-key    # Generate key

...
Real name: Martin Heinz
Email address: martin7.heinz@gmail.com
You selected this USER-ID:
    "Martin Heinz <martin7.heinz@gmail.com>"

pub   rsa3072 2021-01-18 [SC] [expires: 2023-01-18]
      <SOME_VALUE>
uid                      Martin Heinz <martin7.heinz@gmail.com>
sub   rsa3072 2021-01-18 [E] [expires: 2023-01-18]

git config --global user.signingkey <SOME_VALUE>

git commit -m "Signed commit." -S  # You will get asked for password here...
git push
You would first generate GPG keypair (assuming you don't have one already), then set your signing key using git config ... and finally add -S option when committing your code. When you then view the commit information in GitHub, you would see the badge like in the picture below.
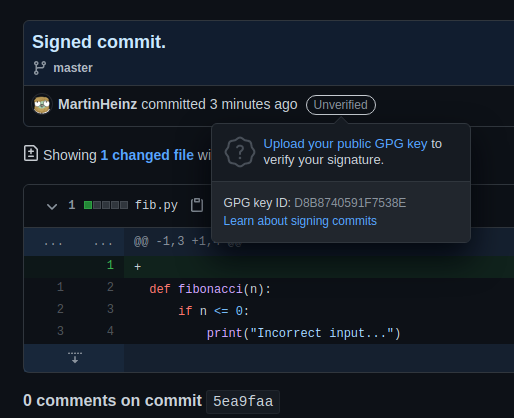
As the image shows though, the signature is unverified because GitHub doesn't know the GPG key belongs to you. To fix that, we need to add the public key from our keypair to GitHub. To do that we export the key using gpg --export as you can see here:
gpg --armor --export <SOME_VALUE>
-----BEGIN PGP PUBLIC KEY BLOCK-----
...
-----END PGP PUBLIC KEY BLOCK-----
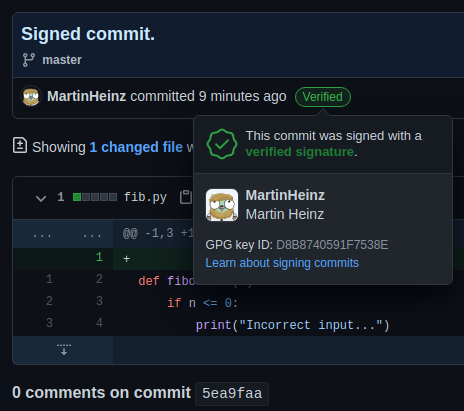
Then you would take this key and paste it in the field at https://github.com/settings/gpg/new. After the key is added, if you check the previously signed commit, you would see that it's now verified, assuming that you added same key to GitHub as the one you used for signing:
Closing Thoughts
git is very powerful tool that has too many sub-commands and options for it to be all covered in single article. If you feel like diving deeper into some git-related topics I would recommend reading Debugging with Git for information on blame and bisect or Getting solid at Git rebase vs. merge for more in-depth explanation of rebase and merge. Apart from many useful article on the internet, oftentimes your best bet when looking for info on some intricacies of git would be to look through man pages using --help option or its online version at https://git-scm.com/doc.